How to assemble a map for a multiplayer shooter,” said level designer at Treyarch and Call of Duty fan Muhammad Ayub.
I’ve been making maps for the Call of Duty community for the last 8 years. Over the years, I have learned a lot about the principles and rules of level design, and I successfully apply this knowledge in creating levels. Below I will describe in stages what it takes to make an interesting multiplayer map.
As part of this article, I will talk about creating a multiplayer map using the example of Call of Duty: Modern Warfare. Let’s call the map Tugurios. Now you can go to the location history and map parameters.
- Tugurios is Spanish for “shacks”, the map shows slums in the Venezuela area.
- Gold was discovered in the hills, and slums grew up around them by themselves, in which gold miners lived.
- Years later, the deposit dried up. There was nowhere to work, and the slums became a haven for arms and drug dealers.
- When the situation got out of control, the government sent special forces.
- The match starts at noon. One team will spawn in the slums, and the other – on the road at the bottom of the map.
Here is a top view to make it clear what the map looks like.
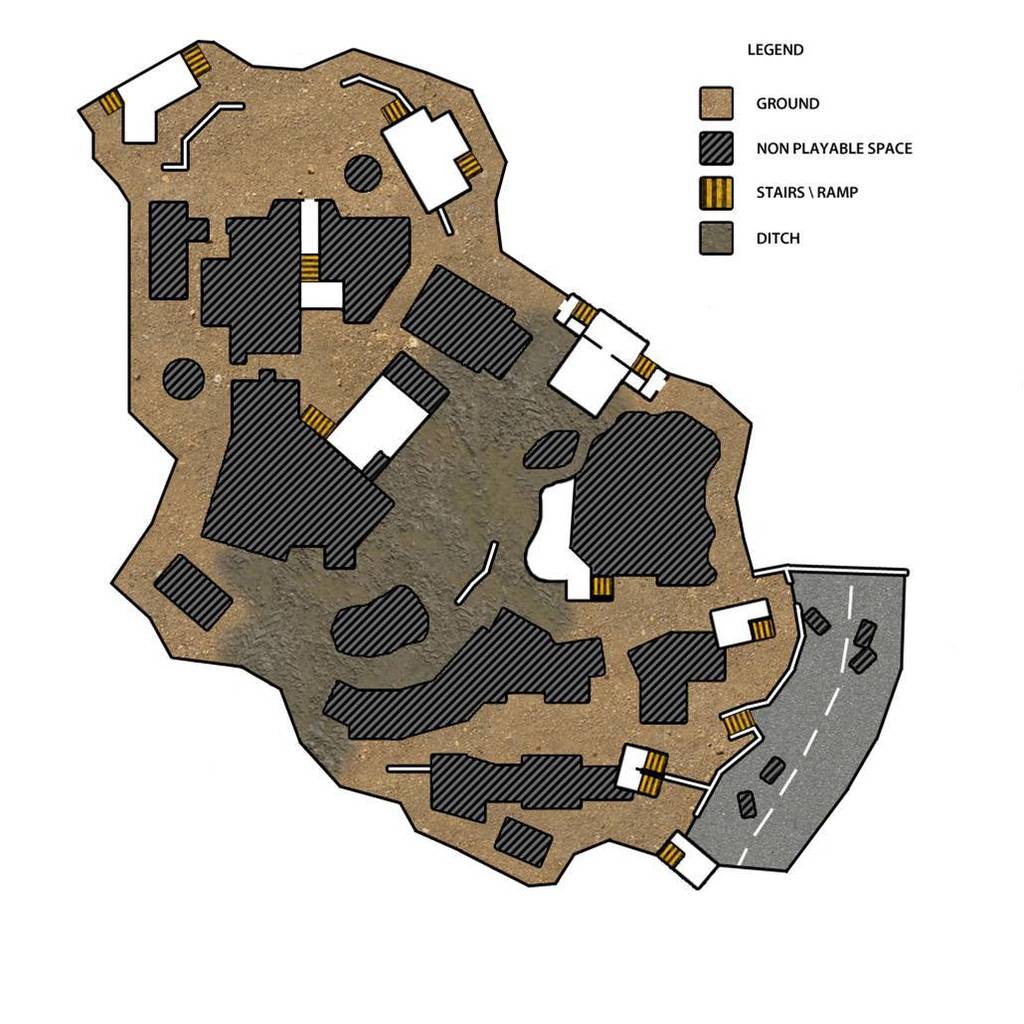
The following locations are located on the map:
Hills
- The hills and surroundings are arid and dusty, with many angles and uneven planes to show the consequences of mining operations.
- All buildings in this area are made of corrugated metal plates with windows. They used to have offices.
Moat
- The ground in the moat is damp, water flows in the middle, and greenery grows on the slopes. There will be some big rocks to hide behind.
Slums
- The shacks in the slums are made of red brick, cinder blocks and layers of corrugated metal.
- There are piles of garbage and empty rock all around. They can also be used as a shelter.
- Some of the houses stand directly on the roof of other houses – thus two- and three-storey buildings are created.
- Electric wires hang everywhere.
- The walls are covered with dirt and graffiti.
- There are either slabs of concrete with holes under your feet, or thick grass.
Road
- There is a spawn point for Team A on the road . It is covered with cracked, dusty asphalt. There are cars parked here and there that can be used as a shelter.
- The road is half a floor or a floor above ground level, so that it is not visible from below, and the player must either climb the stairs or climb the wall.
Crane base
- A large concrete base for a crane that was used during mining operations. There is no crane, but the concrete structure is still in place.
- It looks like a concrete bunker with rebar sticking out of the holes.
- The base is similar to the concrete platforms that were used for anti-aircraft guns in World War II.
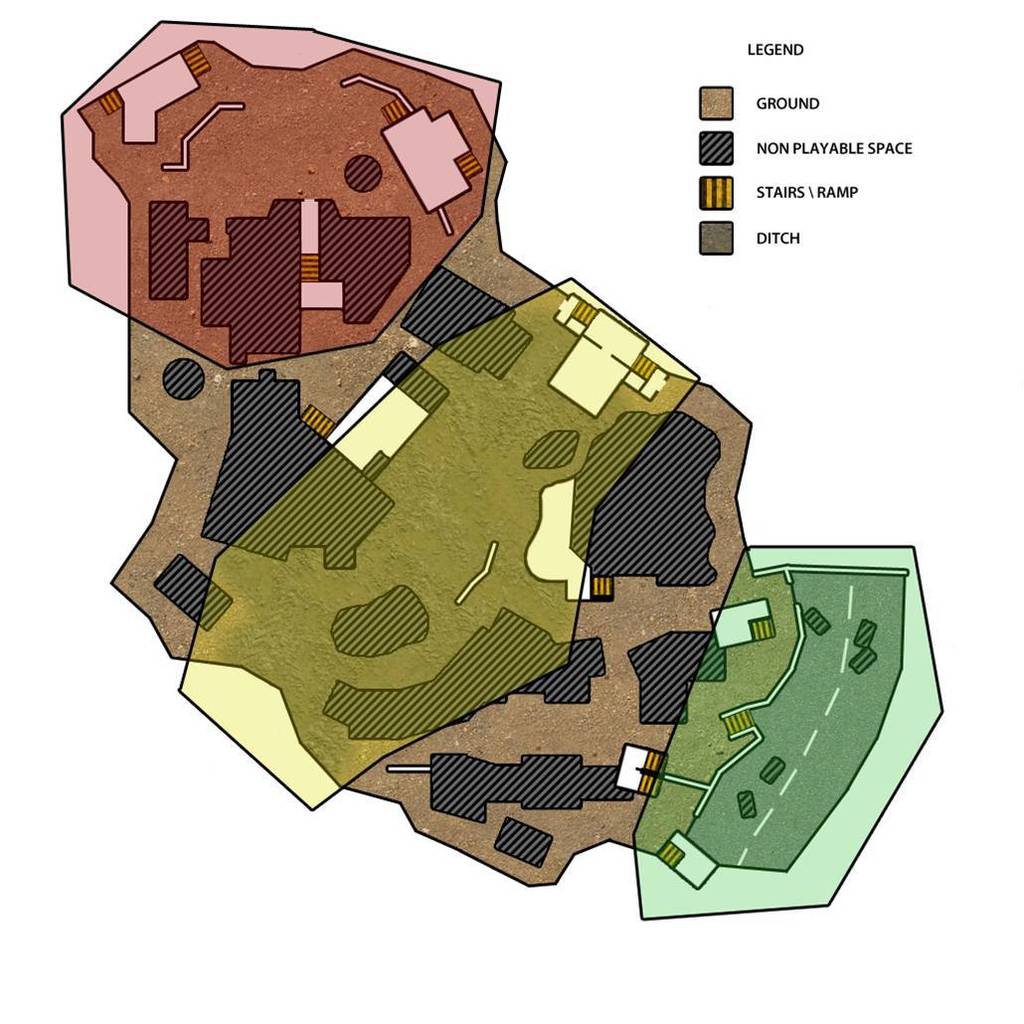
- Slums are marked in red.
- Small, chaotically located shacks, stacked one on top of the other. Some reach a height of three floors.
- The road next to the hills is marked in green. The hills have square outlines because of the work that was carried out there.
- The locations are separated from each other by a deep moat, which is marked in yellow. It is as deep as a one-story building. In order to get to the other side of the map, you need to cross this moat.
Height
There are many locations of different heights on the map. This is done in order to block too long line-of-sight lines and make the map more interesting.
- The places marked with 1 are earth. There is a moat at this height. The height of one floor is about 4 meters from floor to ceiling.
- The rest of the rooms are the height expressed in floors.
- For example, the road is three floors (12 meters) higher than the moat.
Spawn points
- Special Forces, or Team A, will spawn on the road. This section is marked in green.
- The People’s Militia, or Team B, will spawn in the slums, in a location marked in red.

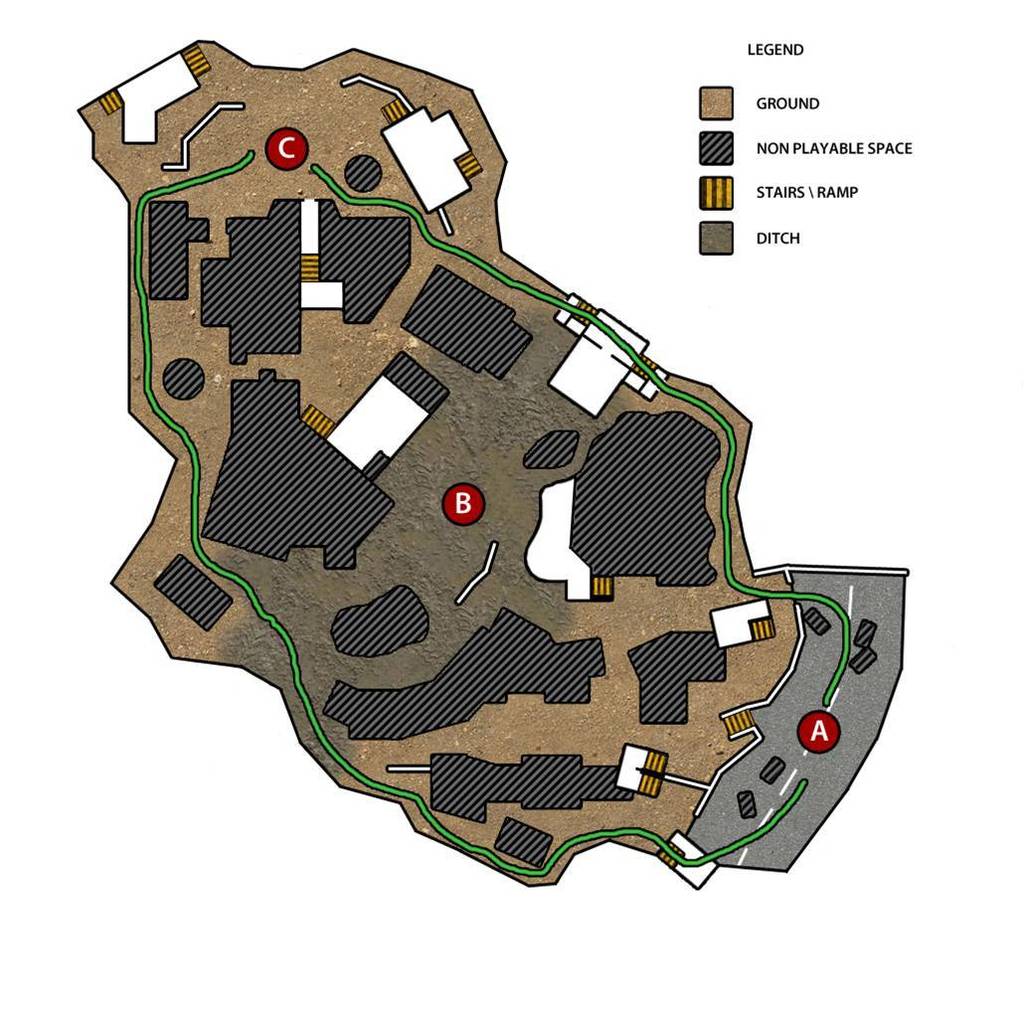
Goals
When I make a multiplayer map for Call of Duty: Modern Warfare, I usually keep the Domination game mode in mind. This helps a lot to create a balanced map where neither team has an advantage over the other.
- Three points on the map, marked with the letters A, B and C, are three flags for playing in Domination mode.
- Points A and C are easy to capture because they are not far from the spawn site. The most difficult thing will be to capture and hold In, because it is in the center of the map and is surrounded by objects on all sides.
Ways
The main way
- The red line that connects the two sections of the map shows the Main or shortest path.
- This path is the shortest, but leads through the most dangerous areas of the map.

Workarounds
- The green line marks the workarounds. Both of these paths are longer than the Main one, but with their help you can take a flanking position and bypass the most dangerous zone in the center.
- Nevertheless, using these paths, players are in sight longer, which means it will be more convenient for snipers to shoot them.
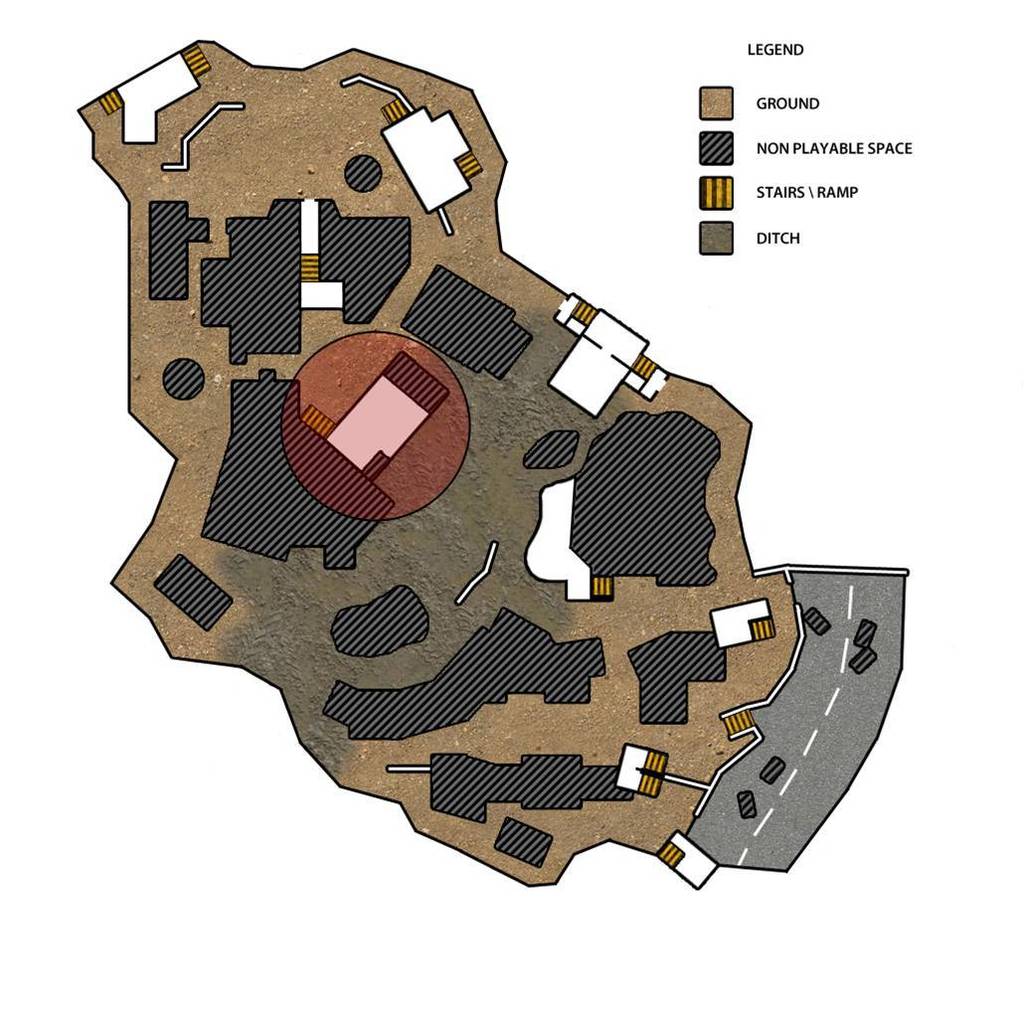
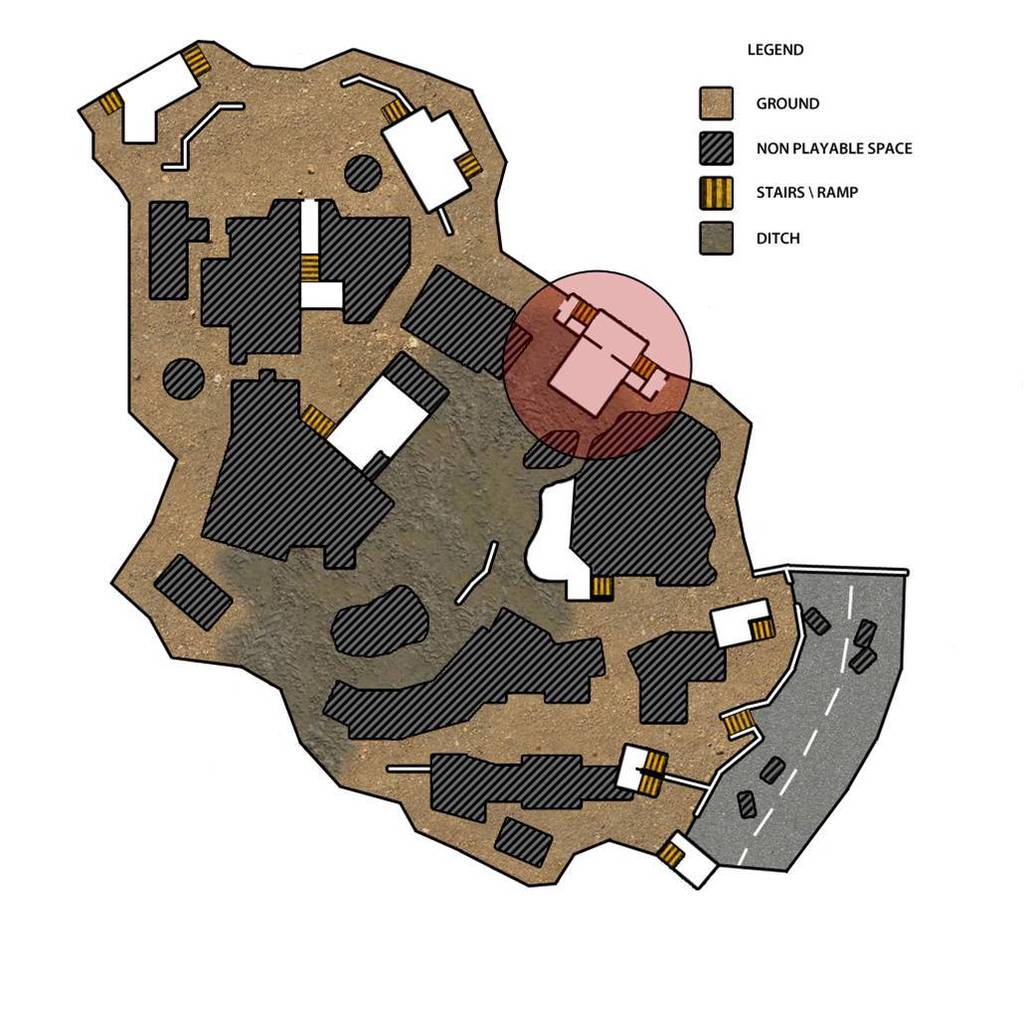
Points of interest
There are several points of interest on the map – locations that will give an advantage to the team that captures them.
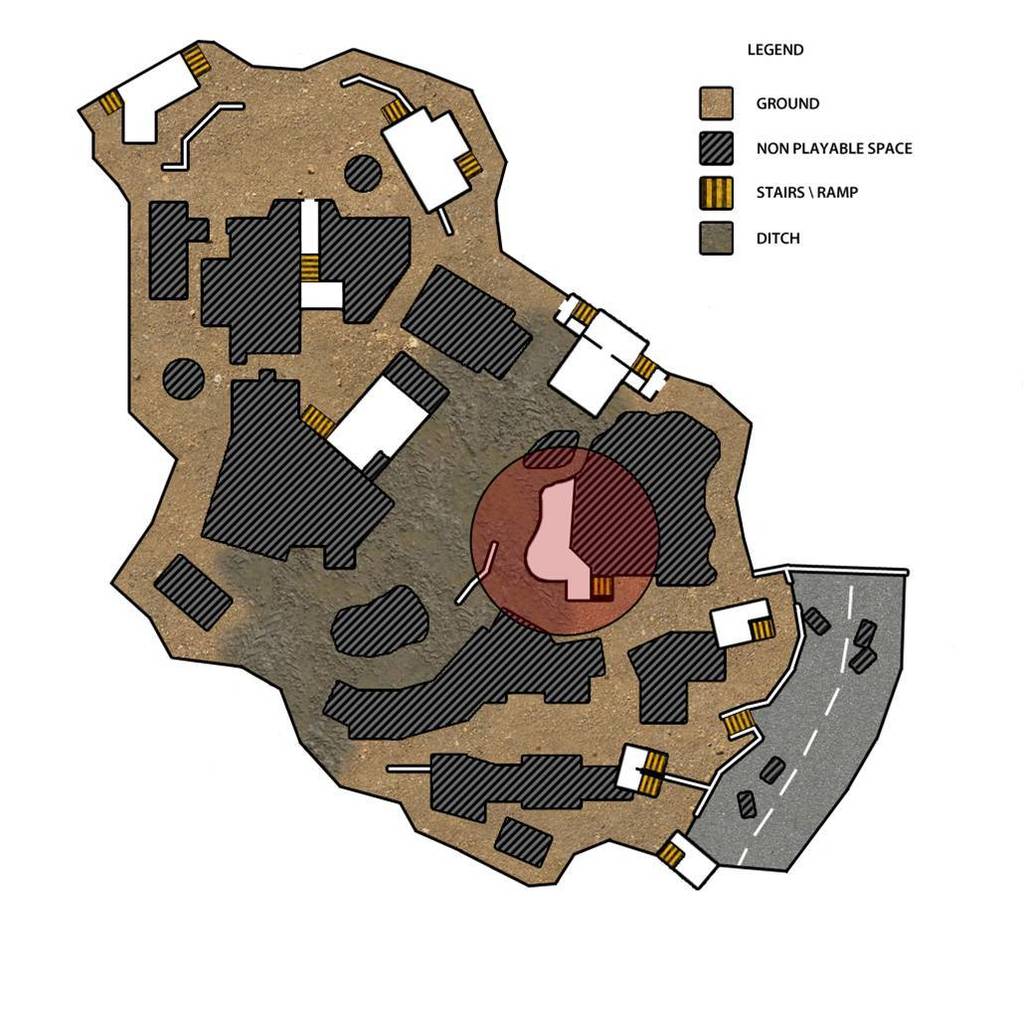
- The first point is circled in red. This is a ledge with a good view of the moat. It rises three floors above the moat.
- From here, players, as shown below, can control the moat and two other points of interest.
- It is more convenient to get to this point for Team A, which spawns on the road.
- The point is circled in red and is three floors higher than the moat.
- It can only be accessed from the back side. However, users who play for the people’s militia can quickly get to it.
- From this location, you can control the moat, the point of interest on the opposite side and another one, which is located in the upper right sector of the map and is shown in the following illustration.
- The point is marked in red. This is a concrete base for a crane that was used in mining operations.
- This point can be reached from both sides by stairs.
- You can see the moat from here. The point is three floors above it.
- From this point, players can control the entire moat and two other points of interest, which are shown in the previous slides.

- The point is marked in red. There are two workarounds and the Main Path.
- If Team A occupies a two-story structure on the right, it will control the Main Path.
- The opposing team can occupy the ledge on the left and “shoot” the players of the opposing team who control the moat.
- If the team occupies this location, it will be able to control the moat and point A.

- The point is marked in red. It offers an overview of point C and the road to the moat.
- This is a two-storey building, where you can climb from both sides by stairs. The building has a back door, with which players can reach the enemy soldiers unnoticed and attack them.
- Team B needs to hold this point in order to control the road to its own base and shoot players who are trying to occupy point C.
Line of sight
When creating a multiplayer map, it is very important to remember about the lines of sight, because they determine the angle of fire, as well as the location of AI on the map. For clarity, I marked the line of sight on the map.
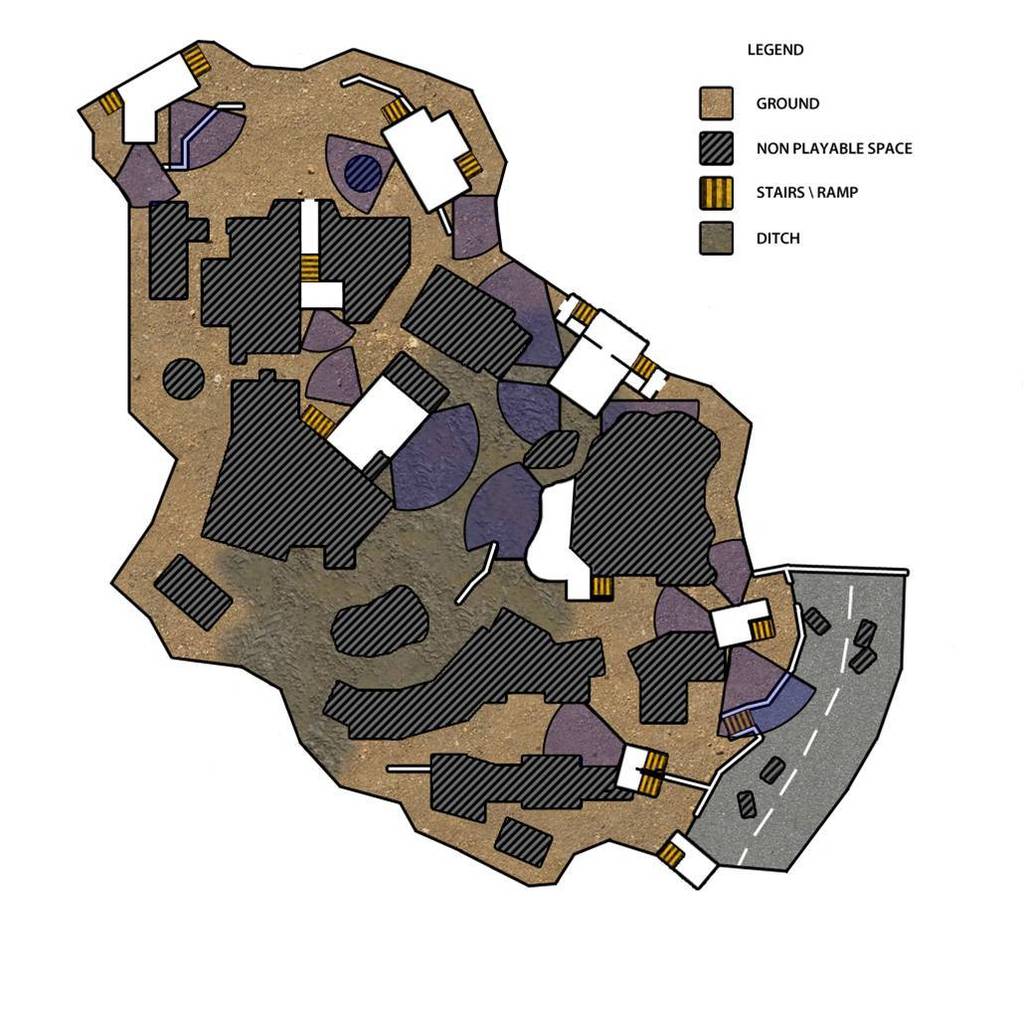
- The blue cones show what the player sees from the elevations or from the windows of two- and three-story buildings.
- The cones are quite small – just to demonstrate the size of the player’s field of view. In fact, the line of sight continues much further.
- This image helps to understand where windows and elevations are located on the map, and which areas of these points are visible.
In this text I have talked about the most basic principles of level design, but with their help you can take the first steps in creating levels.
Translated by Irina Smirnova
Source: Gamasutra